After exploring various sites, there is no doubt you've seen many different
display techniques and hypermedia links. In the documents we looked at we've
seen a wide variety of fonts, graphics, and links. After experiencing all of
these, you might find yourself wondering how all of this is possible.
Certainly there is no magic producing these effects (it's only a computer,
after all...), instead the documents we've seen are simple ASCII text files.
Of course, in ASCII text there is no way to create italic and bold text, let
alone graphics and hypermedia links. Instead web authors use special sections
of text called tags. As a whole the tags compose a kind of text formatting
language, in effect.
On the web tags are used to create everything from an italic word to a
hypertext link pointing to a site thousands of miles away. Netscape (and other
web browsers) simply interpret the HTML tags to produce the formatted web
documents we see.
There are many types of tag systems used to create documents. The one most
common on the web is called HyperText Markup Language, or simply HTML. While
HTML lacks the power and flexibility of sophisticated text formatting
languages like LaTeX and Postscript, its simplicity and simple requirements
make it easy for both beginners and veterans to create top-quality web
pages.
Note: There are many formatting elements that are not yet widely supported
by HTML. These elements include centering, indentation, and tables. Many
browsers (Netscape in particular) have built-in support for their own
elements, and even the proposed HTML 3.0
elements. But these tags are still not universally supported, and thus will
be omitted from the tutorial section of this document. The most common (and
useful) of these tags are included in section 3, since it is meant as a
reference instead of a tutorial.
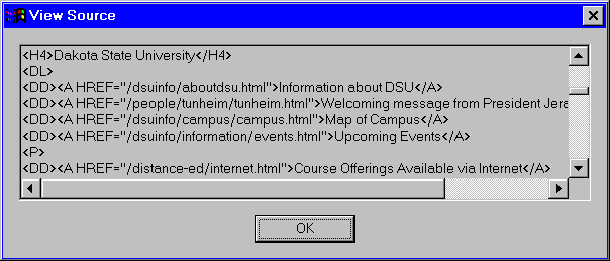
We can even see each page's HTML code. While at DSU's home page select the
view menu, then choose source. Netscape will present a window
containing the HTML code used to create DSU's home page.
In this chapter we will create our first simple HTML file, and use Netscape
for Windows to view and check it. Later we will add graphics and hypertext
links. Before you begin this chapter, you must be familiar with DOS naming
conventions, the Windows environment, Windows Paintbrush, and basic word
processing.
Getting Started HTML documents are ASCII text files which use tags to indicate
formatting and structural information. A tag is simply a left angle bracket
(<) followed by a directive or command, followed by a right angle bracket
(>) to close the tag. They can be made with any word processor or text
editor that can save files as ASCII text. For simplicity we will simply be
using Notepad for Windows. Before starting, make sure that you have icons for both Netscape and
Notepad, and that both programs work correctly. (See Part 1 for instructions
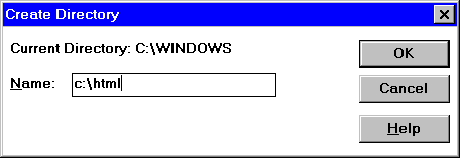
on using Netscape.) First, let's create a directory on our hard drive that we can use to store
our files and graphics. Next start up Notepad, which is usually located in the Program Manager
group Accessories. Type in the text below exactly as shown. Then save
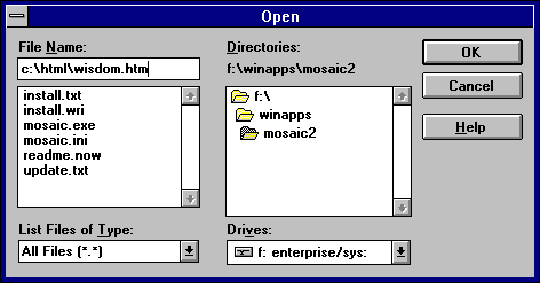
the file as c:\html\wisdom.htm When you are done, minimize Notepad and open Netscape for Windows once
again.
From the File menu, select Open File, then type in
c:\html\wisdom.htm and click on [OK].
Figure 10 - Opening a local file in Netscape Mosaic should open and process the newly created HTML file and produce
something similar to the following.
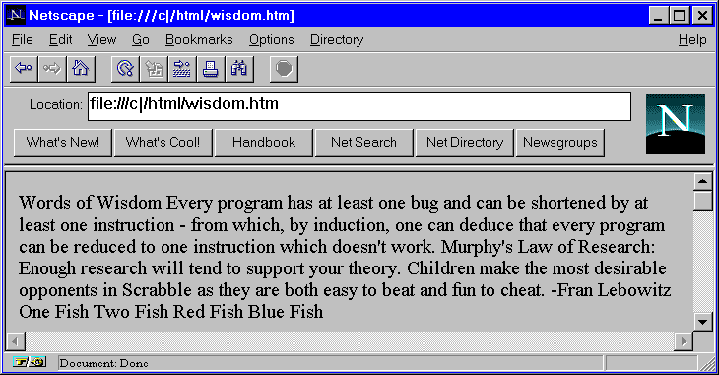
Figure 11 - 1st version Don't worry! Since we included no HTML tags in the document,
Netscape had no way of knowing how we wanted the document to look. If we look at the hypertext document produced, we can see a few things have
changed. Most noticeably, it ignored all of our blank lines and carriage
returns, thus running all of the text in the document together. In HTML you
have to specify things like the start of new paragraphs and where you want
text to be indented. To begin formatting the document, switch back to Notepad, and add the line
<TITLE>Words of Wisdom</TITLE> at the beginning of our document. This will tell the document
viewer (Netscape in our case) that the title of the document is "Words of
Wisdom". Next bring up Notepad and add <P> every place we have a blank
line. This instructs Netscape to start a new paragraph and leave a blank line
at that point. Note that unlike the <TITLE> command, we do not need to
specify the end of paragraphs via a </P> command. When finished your
document should look like for following: After resaving the HTML file, switch back to Netscape and click on the
reload button,
Notice that the paragraphs are all now separated by blank lines. Keep in
mind that adding two <P> commands in a row will not make a blank line
that is any bigger than a single <P> since it does not make sense to
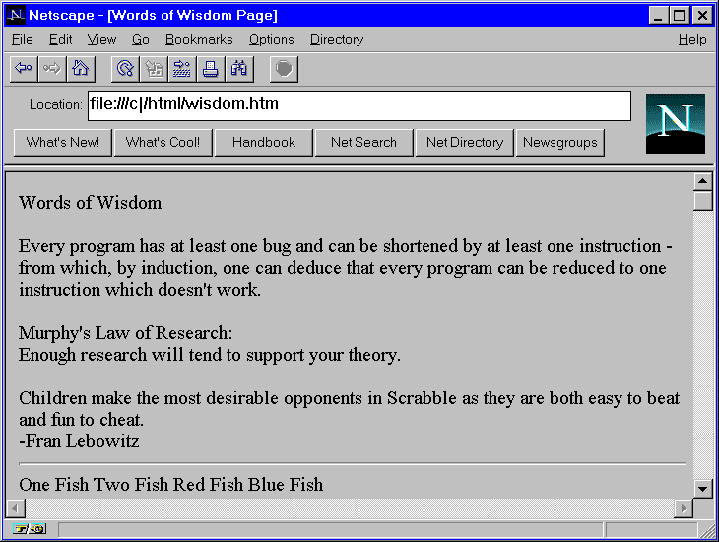
have two paragraphs start in the same place. For situations in which we need to specify when words should start on a new
line we can create a break by using the <BR> command. Let's add a break
between "Murphy's Law of Research:"
and "Enough research will tend to support your
theory." by placing a <BR> tag between them. Let's also add
one before the line "-Fran Lebowitz"
to start the text on a new line. The last major command used to format pages is the horizontal ruler which
uses the
tag <HR> . Let's use a horizontal ruler to separate Dr. Seuss' list
of fish from the rest
of the document by replacing the paragraph command <P> with an
<HR> . Your completed document (in Notepad) should look like this (the added HTML
tags are in bold):
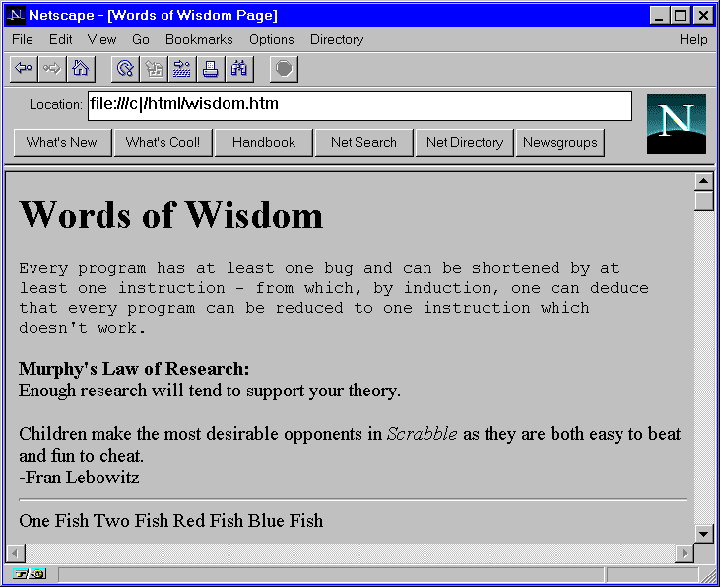
Figure 13 - 3rd version Now that we have formatted the page we can work on formatting the text on
the page. Let's start by creating a header for our document. Headers are text
that is larger than "normal" text on the page. There are seven levels of
headers ranging from very large <H1> to very small <H7>. To create
a header a user starts the header command by specifying the header command and
the size (x) with the command <Hx>. After typing the header text end the
header is ended with the command </Hx>. Make "Words of Wisdom" a level one header by adding commands around it like
so:
<H1> Words of
Wisdom </H1> Besides multiple sized characters, HTML also supports italics and
bold; you can make "Murphy's Law of Research:" bold and "Scrabble"
italics by editing your document so that it matches the text on the following
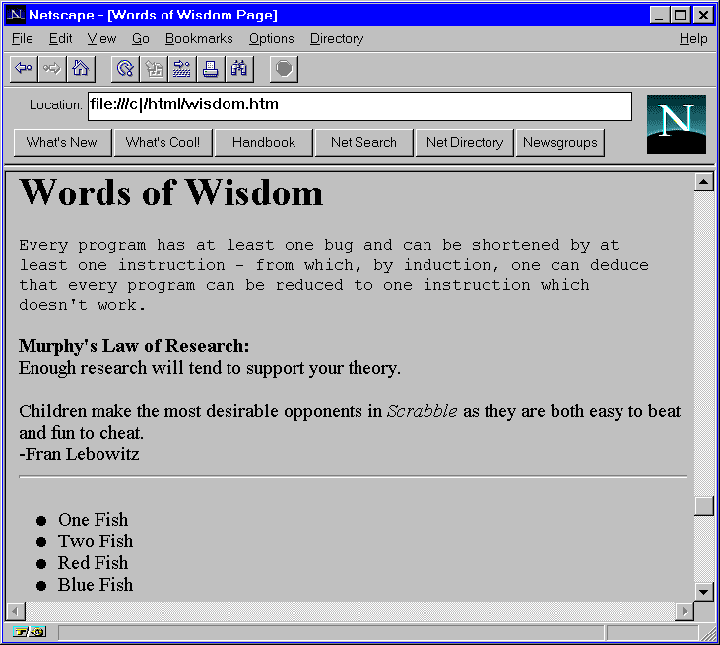
page: (changed parts are printed in bold) Before continuing, save the document and reload it in Netscape. Your new
document should look similar to the picture below. If it does not, switch back
to Notepad and make sure that your HTML code matches the code above.
The last major command for formatting text is the command to specify
preformatted text. This is useful when presenting information that is centered
or that contains columns of information, since there are no widely supported
commands to accomplish these tasks. To define text as preformatted, add the
tag <PRE> before the text and the tag </PRE> after it. For our
document, let's format the first paragraph as preformatted by adding
<PRE> tags before and after the body of the paragraph.
Figure 15 - 5th version Now that we've formatted our text, let's format the Dr. Seuss list at the
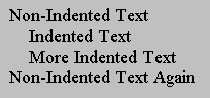
end of our document. There are 3 main types of lists in HTML: Definition
Lists, Ordered Lists, and Unordered Lists. Definition Lists (also called Description Lists) create
indented and non-indented text. Note that creating a list of only Non-Indented
text is useful when we want to make a list in which the items aren't
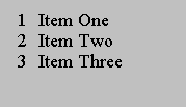
emphasized. The two parts of a Definition list are Data Terms <DT> and Data Descriptions <DD> Ordered Lists can be used for lists of items that you wish
numbered. Items in the list are designated with <LI> indicating that they are List
Items. Unordered List is used for lists that shouldn't include
numbers, but which you want to be emphasized with bullets. As with ordered
lists items in the list are designated with <LI> indicating that they are List Items. Our newly formatted list should look like the following:
Figure 16 - 6th version
Now that the text is prepared, we can start adding simple graphics to our
document. Netscape supports and will display several graphic formats, the most common
of which is the gif format. We will be using Paintbrush (found in the
Accessories group in Windows) to create a title graphic for our "words
of wisdom" document. Then we will use a program called LView Pro to save our
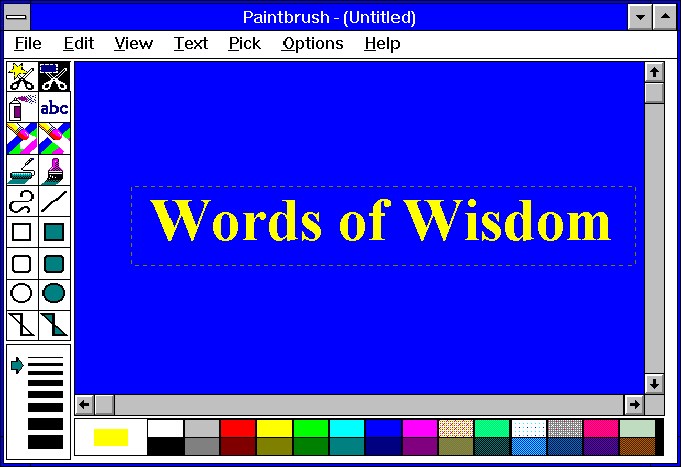
graphic as a gif file we can import into our HTML file. To create our title bar start Paintbrush and use the fill tool Next select the yellow color, then the text tool.
Figure 17 - Setting text parameters in
Paintbrush Click on the workspace and type: "Words of Wisdom" Next use the cutting tool
Figure 18 - Selecting Text Next exit from Paintbrush (you will not need to save the current file) and
switch to Program Manager. Start LView Pro if you have an icon for it, or
select Run from the File menu and type in
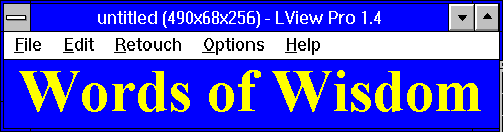
F:\winapps\lview\lviewp14.exe in the space provided. When LView comes up select Paste from its Edit menu. LView
Pro and your artwork should look similar to the following.
Figure 19 -The title graphic in LView Pro Choose Save As from the File menu, choose gif 87a
(*.gif) under the File Type menu, then enter
c:\html\words.gif as the file name.
Figure 20 - Saving the Graphic in the gif
format When you're done, click [OK] to save your artwork. Now that we have a graphical title bar, we can use it to replace our text
based title.
After exiting from LView, use Notepad to replace the line <H1>Words of
Wisdom</H1>
with the text <IMG SRC="words.gif" ALT="Words of Wisdom"> This will tell the document viewer to display the image as directed by SRC
if it can display graphics, and display the text "Words of Wisdom" as an
alternate if it cannot display graphics. After saving your changes and reloading our file in Netscape, you should
have a document similar to the example below.
Figure 21 - 8th version As we saw in Section 1, there is much more that can be done with graphics,
but it is all done in the same basic way we have used in this chapter to
create our title bar graphic.
Hypertext links are the key to the success of the World Wide Web. By being
able to get information or connect with another site by simply clicking on a
word, sentence, or image, hypertext changes the way information on the
Internet is found. Gone are the days when users had to memorize complicated,
cryptic commands and the names of machines in far away places. There are two basic kinds of hypertext links, internal links within a
document, and external links to other documents. Internal links can be used
when a user might wish to skip parts of a document (a glossary for example).
An internal link helps make a document simpler to read by allowing the reader
to jump over information they do not care to read, and to the information they
are interested in. External links connect one document to another, whether
that document is close at hand or on a machine on the other side of the
world. Hypertext links are created by the use of anchors. Anchors are the words or
images that the user clicks on to move via the link. Anchors may be a single
word, an entire paragraph, or an image.
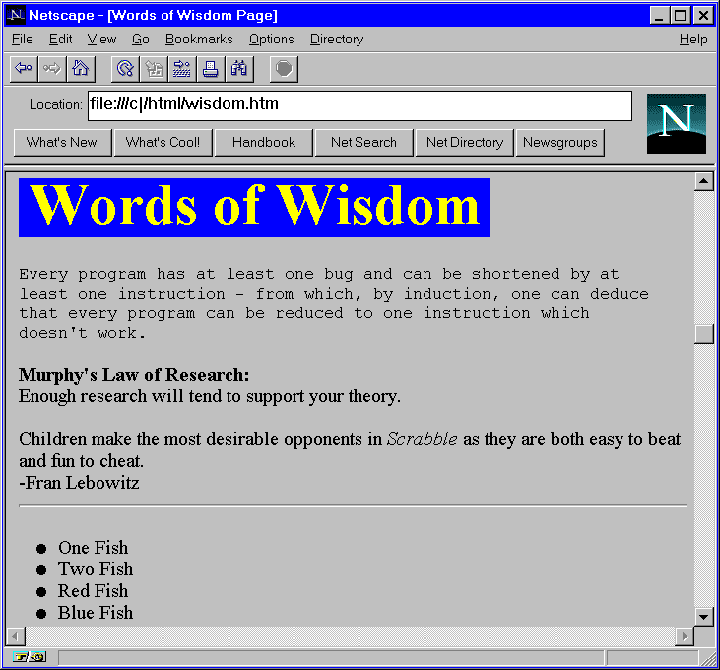
To practice, add an external link from our sample document to DSU's home
page. To do this, add the following lines to the end of our HTML file
c:\html\wisdom.htm using Notepad. If you test the link by clicking on the word here Netscape should
load DSU's home page. Congratulations, you've
created your first hypertext document!
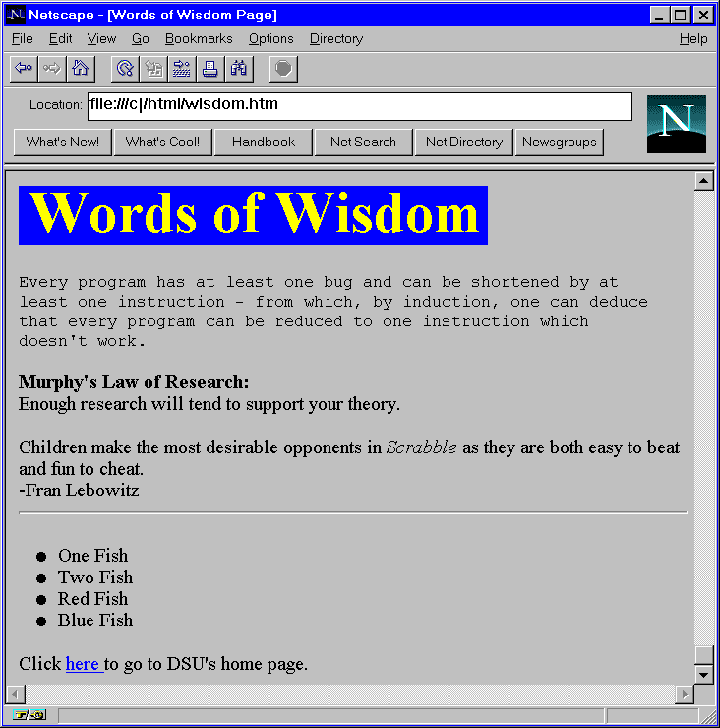
Figure 22 - 9th and final
version
 You will need to make sure that
Notepad's word-wrap function (located under the edit menu) is not turned on.
Instead you must put carriage returns in manually.
You will need to make sure that
Notepad's word-wrap function (located under the edit menu) is not turned on.
Instead you must put carriage returns in manually.Words of Wisdom
Every program has at least one bug and can be shortened by at
least one instruction - from which, by induction, one can deduce
that every program can be reduced to one instruction which
doesn't work.
Murphy's Law of Research:
Enough research will tend to support your theory.
Children make the most desirable opponents in Scrabble as they
are both easy to beat and fun to cheat.
-Fran Lebowitz
One Fish
Two Fish
Red Fish
Blue Fish
 We used
<TITLE> to tell Netscape we are starting a title, and </TITLE> to
tell it we are finished with it. Most formatting commands start with the form
<COMMAND> and end in the format </COMMAND>, this tells the
computer that the font, title, or graphic is over. Many people's HTML errors
are caused by forgetting to end formatting commands.
We used
<TITLE> to tell Netscape we are starting a title, and </TITLE> to
tell it we are finished with it. Most formatting commands start with the form
<COMMAND> and end in the format </COMMAND>, this tells the
computer that the font, title, or graphic is over. Many people's HTML errors
are caused by forgetting to end formatting commands.
 Note: Netscape for Windows does not
require you to have a title to your HTML files, but as a general rule, titles
should always be included. Also note that commands such as <TITLE> are
often typed in upper case, and will be in this manual for clarity. However, it
is not necessary for them to be upper case, HTML viewers interpret
<TITLE> and <title> as the same command.
Note: Netscape for Windows does not
require you to have a title to your HTML files, but as a general rule, titles
should always be included. Also note that commands such as <TITLE> are
often typed in upper case, and will be in this manual for clarity. However, it
is not necessary for them to be upper case, HTML viewers interpret
<TITLE> and <title> as the same command.
<TITLE>Words of Wisdom</TITLE>

Words of Wisdom
<P>
Every program has at least one bug and can be shortened by
at least one instruction - from which, by induction, one can
deduce that every program can be reduced to one instruction
which doesn't work.
<P>
Murphy's Law of Research:
Enough research will tend to support your theory.
<P>
Children make the most desirable opponents in Scrabble as they
are both easy to beat and fun to cheat.
-Fran Lebowitz
<P>
One Fish
Two Fish
Red Fish
Blue Fish
 located on the menu bar.
Netscape should reload and reformat the document to look like the following:
located on the menu bar.
Netscape should reload and reformat the document to look like the following:
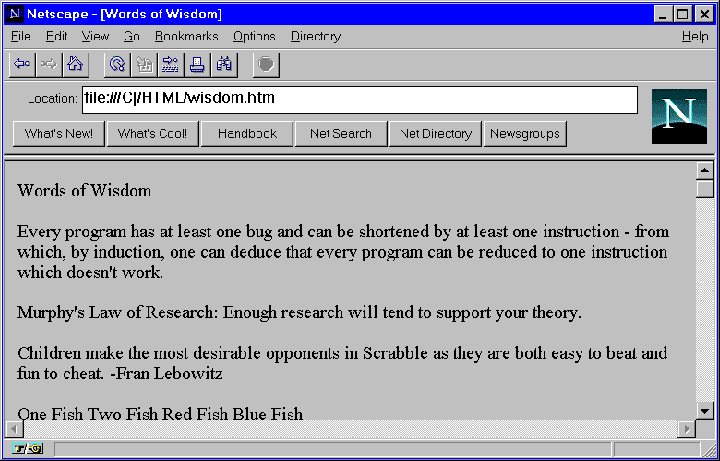 Figure 12 - 2nd
Version
Figure 12 - 2nd
Version
<TITLE>Words of Wisdom Page</TITLE>
Words of Wisdom
<P>
Every program has at least one bug and can be shortened by at
least one instruction - from which, by induction, one can deduce
that every program can be reduced to one instruction which
doesn't work.
<P>
Murphy's Law of Research:
<BR>
Enough research will tend to support your theory.
<P>
Children make the most desirable opponents in Scrabble as they
are both easy to beat and fun to cheat.
<BR>
-Fran Lebowitz
<HR>
One Fish
Two Fish
Red Fish
Blue Fish
After saving, click the reload button  in Netscape the newly formatted page should
look like this:
in Netscape the newly formatted page should
look like this:
<TITLE>Words of Wisdom Page</TITLE>
<H1>Words of Wisdom</H1>
<P>
Every program has at least one bug and can be shortened by at
least one instruction - from which, by induction, one can deduce
that every program can be reduced to one instruction which
doesn't work.
<P>
<B>Murphy's Law of Research:</B>
<BR>
Enough research will tend to support your theory.
<P>
Children make the most desirable opponents in <I>Scrabble</I>
as they are both easy to beat and fun to cheat.
<BR>
-Fran Lebowitz
<HR>
One Fish
Two Fish
Red Fish
Blue Fish
Notice that we have simply added the <B> and <I> tags around
the appropriate sections.
 Figure 14 - 4th
version
Figure 14 - 4th
version <PRE>
Every program has at least one bug and can be shortened by at
least one instruction - from which, by induction, one can deduce
that every program can be reduced to one instruction which
doesn't work.
</PRE>
When reloaded, our document should look like the following:
 Note that most
viewers use a different font to display preformatted text, which is why the
preformatted text above looks different from the "regular" text around it.
Note that most
viewers use a different font to display preformatted text, which is why the
preformatted text above looks different from the "regular" text around it.
<DL>
<DT>Non-Indented Text
<DD>Indented Text
<DD>More Indented Text
<DT>Non-Indented Text Again
</DL>
<OL>
<LI>Item One
<LI>Item Two
<LI>Item Three
</OL>
For our list, let's use an unordered list. Switch to Notepad and edit
the lines: 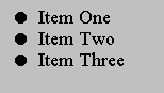 <UL>
<LI>Item One
<LI>Item Two
<LI>Item Three
</UL>
<UL>
<LI>Item One
<LI>Item Two
<LI>Item Three
</UL>
One Fish
Two Fish
Red Fish
Blue Fish
to be: <UL>
<LI>One Fish
<LI>Two Fish
<LI>Red Fish
<LI>Blue Fish
</UL>
Save the edited file, then switch to Netscape and click the reload
button.
 to create a blue
background by clicking on the blue square on the bottom, then the fill tool,
and finally the blank work space.
to create a blue
background by clicking on the blue square on the bottom, then the fill tool,
and finally the blank work space.
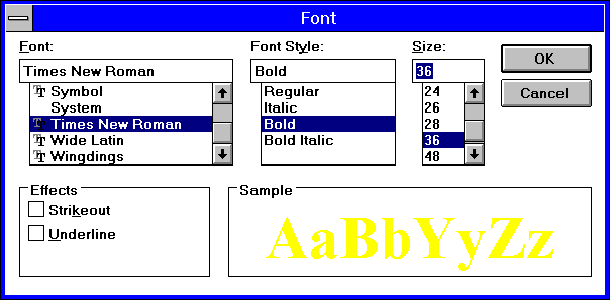
 Then choose Fonts
from the Text menu, select Times New Roman as the font, Bold as the
Style, and 36 as the size.
Then choose Fonts
from the Text menu, select Times New Roman as the font, Bold as the
Style, and 36 as the size.
 to select your newly formed text, and choose Copy from
the Edit menu.
to select your newly formed text, and choose Copy from
the Edit menu.

 Note that the ALT="xxx" tag is not
required, but that many people browse the web using text-based viewers such as
Lynx. If no alternative to the graphic is provided, these people will
see nothing in that area. While using ALT tags are not required, they are
important for providing information to the widest number of people while using
the web.
Note that the ALT="xxx" tag is not
required, but that many people browse the web using text-based viewers such as
Lynx. If no alternative to the graphic is provided, these people will
see nothing in that area. While using ALT tags are not required, they are
important for providing information to the widest number of people while using
the web.
<P>
Click <A HREF="http://www.dsu.edu/"> here </A>
to go to DSU's home page.
What this will do is create a link to the URL http://www.dsu.edu/
anchored on the word here. When you are finished remember to save, then
switch to Netscape and reload the document. At the very bottom, you should see
the following.